Rubblewebs
THESE CODES ARE PROVIDED FOR AN EXAMPLE OF HOW TO USE IMAGEMAGICK WITH PHP. CARE SHOULD BE TAKEN WHEN ACCEPTING USER INPUT.
I TAKE NO RESPONSABILTY FOR ANY PROBLEMS THAT MAY OCCURE WHEN USING ANY OF THIS CODE.
IT IS UP TO YOU TO SECURE THE CODE AND VALIDATE USER INPUT.
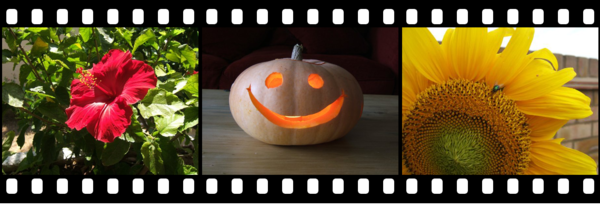
This code creates a film strip effect

/* When you have created your film background you can comment it out
to save recreating the film background everytime this code is run.
To do that comment out between the lines indicated and the
unlink ("complete_film.png"); line.

In this code the photos are in a folder called photos which is
in the same folder as this code.

Currently setup to work with .jpg or .JPG extensions and saves
back to the photos folder.

Saves the photos as png to retain the transparency,
if you save a a jpg the sprocket holes will be black and everytime you
run the code you will generate jpgs with an extra row pf holes as they
will be read again. In this case you would need to change the way
the photos are saved.

I have appended the photos for the image above; the ones created
will be individual photos*/

// Sprocket hole
$sprocket_height = '28';
$sprocket_width = '20';
$sprocket_corner = '5';
$sprocket_offset_x = '10';
$sprocket_offset_y = '17';
$sprocket_r = $sprocket_offset_x + $sprocket_width;
$sprocket_b = $sprocket_offset_y + $sprocket_height;

// Film size( was 350 x 380 for 35mm static film but modified for digital photo aspect ).
$film_height = '385';
$film_pitch = '380';

// Actual canvas to use so that when the film extends to a new line there is a gap between the strips - adds a 10px transparent strip to the bottom of each photo.
$spacer_height = '10';
$canvas_height = $film_height + $spacer_height;

// Calculate the frame offset to allow for the transparent strip at the bottom.
If ( $spacer_height > 0 ){ $frame_offset = round( $spacer_height / 2 ); }
else $frame_offset = 0;

// Frame defaults ( was 240 x 360 for 35mm static film but modified for digital photo aspect ).
$frame_height = '280';
$frame_width = '360';
$portrate_width = '240';

/* Comment out start */

// Create sprocket hole detail
// THE DRAW COMAND NEEDS TO BE ALL ON ONE LINE
$cmd = " -size 48x48 xc:none -fill black -gravity center ".
-draw \" roundrectangle $sprocket_offset_x,$sprocket_offset_y
$sprocket_r,$sprocket_b $sprocket_corner,$sprocket_corner \" ";
exec("convert $cmd sprocket.miff");

// Create top sprocket strip
$cmd = " sprocket.miff sprocket.miff sprocket.miff sprocket.miff ".
" sprocket.miff sprocket.miff sprocket.miff sprocket.miff +append ";
exec("convert $cmd top_strip.miff");

// Create bottom sprocket strip
$cmd = " top_strip.miff -flip ";
exec("convert $cmd bottom_strip.miff");

// Create the canvas and frame black background
$cmd = " -size {$film_pitch}x{$canvas_height} xc:none -fill black -gravity northwest ".
" -draw \" rectangle 0,0 {$film_pitch},{$film_height} \" ";
exec("convert $cmd background.miff");

// Cutout the top sprocket holes
$cmd = " -compose Dst_Out top_strip.miff background.miff -gravity northwest ".
" -geometry +2+0 -matte ";
exec("composite $cmd temp_film.miff");

// Cutout the bottom sprocket holes
$cmd = " -compose Dst_Out bottom_strip.miff temp_film.miff -gravity southwest -geometry +2+{$spacer_height} -matte ";
exec("composite $cmd complete_film.png");

// Delete the tempory images used to create the film background
$dir = "./";
$delete_array = glob( $dir."{*.miff}", GLOB_BRACE );
foreach ( $delete_array as $value ) { unlink ($value);}

/* Comment out end */

// Use a specified array - path will need sorting and image1.jpg etc. will need renaming to your images.
// $image_array = array("image1.jpg","image2.jpg","image3.jpg","image4.jpg");
// Or generate the array from images in a folder
$dir = "photos/";
$image_array = glob($dir."{*.jpg,*.JPG}", GLOB_BRACE);

// Loop through the array resizing, oriantating correctly if supported by the
image EXIF data and placing on the background.
foreach ( $image_array as $value ) {

// Change the image format to png to keep the sprocket hole transparency
$old_extension = array( "jpg", "JPG");
$new_extension = array( "png", "png");
$new_name = str_replace( $old_extension, $new_extension, $value );

// Resize the photo and auto-oriantate
exec("convert $value -auto-orient -resize x{$frame_height} temp.png ");

// Get the size of the resized image to check which background to use
$size = getimagesize("temp.png");

// If the photo is a portrate style crop the background
if ( $size[0] < $size[1] ) {
// Put the picture into the image
$cmd = " complete_film.png -crop {$portrate_width}x{$canvas_height}+0+0 temp.png ".
" -gravity center -geometry +0-{$frame_offset} -composite ";
}

// If its not a portrate style use the uncropped background
else {
// Put the picture into the image
$cmd = " complete_film.png temp.png -gravity center ".
" -geometry +0-{$frame_offset} -composite ";
}

// Add the image to the background
exec("convert $cmd temp.png");

// Added a resize
exec("convert temp.png -thumbnail 200x $new_name");

// Delete the tempory resized image
unlink ("temp.png");
}

unlink ("complete_film.png");